

Learning how to use a warping board is an important skill that almost all weavers should know how to do!
It is one of the first steps for setting up your weaving on your loom. When it comes to measuring your warp for your floor, table, or even your rigid heddle loom* there are 2 main options to choose from – a warping board or a warping mill.
Today we are talking about the warping board.
*Rigid heddle looms are often direct warped, but a warping board or warping mill can be used if you don’t have a lot of extra space.
Learn more about the differences between direct and indirect warping here.
Want to watch the video instead? Click “Watch the warping board tutorial” in the table of contents below and it will take you to my YouTube tutorial!
Jump To:
- Why would you choose a warping board over a warping mill?
- First things first: How much warp do you need?
- Create a guide yarn
- Find your warp path
- The importance of the “x”
- Using your warping board
- Warp ties
- How to chain your warp bundle
- Things to keep in mind
- Warp a little faster
- Watch the warping board tutorial
- Shop This Post!
This page may contain affiliate links. If you purchase something through these links then I will receive a small commission – at no extra cost to you! Please read our DISCLAIMER for more info. Thanks for the support!
Why would you choose a warping board over a warping mill?
- Available Space
- Available Funds
Warping boards take up less space than warping mills. This is because they are essentially just a frame with a bunch of pegs and are used when they are either hung on a wall or propped up against something. They are also easy to move around as needed if you don’t have a dedicated space to have it out at all times.
A warping mill, on the other hand, needs room to freely rotate – though it can usually be collapsed when not in use. Warping mills will need a free flat surface with room on all sides. This could potentially be hard to find in a lot of spaces.
Boards tend to be less expensive than mills because they have no moving parts. You could even make one yourself fairly easily with a few tools and some wood.
First things first: How much warp do you need?
If you are planning your weaving then you will need to figure out how many warp ends (individual warps) you need and how long those warps will be. This is the first step when it comes to using your warping board.
If you need help figuring this out then make sure to check out my planning your weaving post. You can also get my Weaving Process & Planning Guide where I walk you through that (and more!) plus you get the exclusive project planning worksheet.

Create a guide yarn

Your guide yarn, also sometimes called the leader yarn or the measure yarn, is an important part about setting up your warping board. You will want to choose yarn that is a different color than your warp. I like to use inexpensive yarn in a bright color so there will be no doubt that it is not my usual warp and it is easy to follow.
Measure out one strand of yarn that is the length of your desired warp plus a little extra (a few inches.) That little extra yarn will allow you to tie your guide yarn to your warping board and still maintain the length you need.
You can (and should!) hang onto this yarn to reuse in the future. Even if your future warp is shorter than your current one, you can mark the new length on your leader yarn and tie it around the correct peg at that point. It is ok to have some extra that isn’t being used. It is better than creating a whole new length of yarn if you don’t have to!
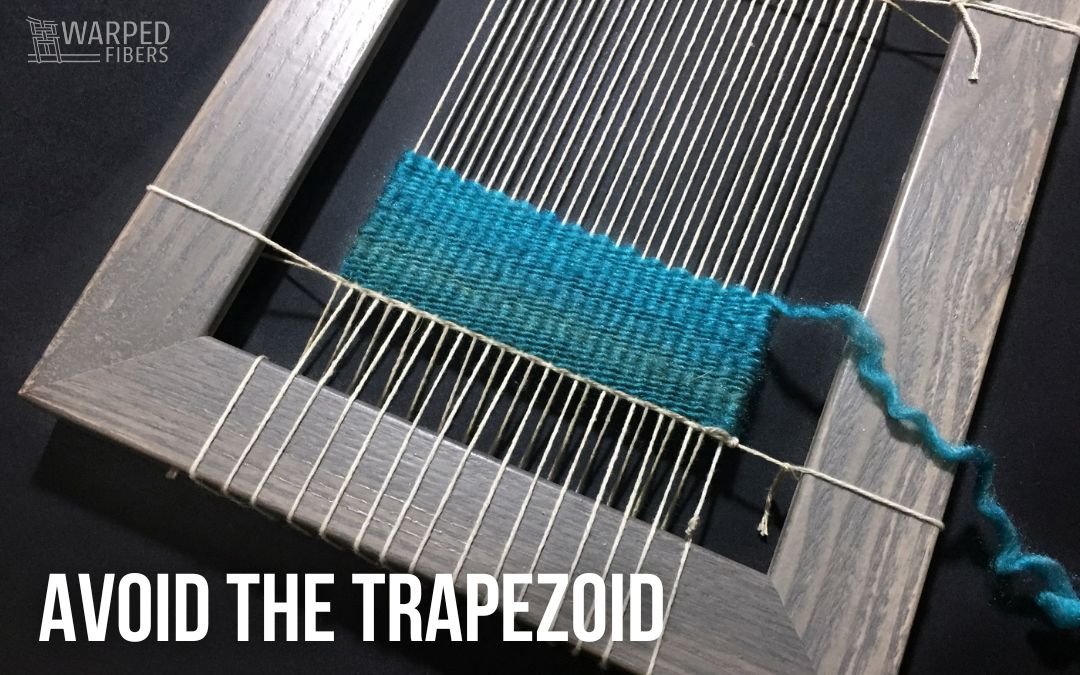
Find your warp path
Not your war path.
…
Your warp path may be different every time you measure your warp depending on your warping board and the length of your yarn. You can follow the side of your frame, zig-zag across it, or do anything in between!
Find the path that makes the most sense to you and one that allows you to create a good rhythm. You will have to follow this path with your warp yarn hundreds of times so don’t make it too hard on yourself and it is a bonus if it can even be a little fun! Put on some music and get into your warping rhythm.
When you apply your guide yarn to your warp path you will want to build in the beginning of your x so that you can account for that extra yarn and it’s easier to follow when you start warping. As you can see in the image above – the leader yarn does not go straight across the top of the pegs. Instead, it bends around and under peg 3.
More on that …
There are now 2 ways to take it – either purchase the whole course at once for a discount or “create your own” course by purchasing just the parts you want! Either way, get 10% off for being a member of the Warped Community!

The importance of the “x”
The x in your weaving is something that you want to stay mindful of when measuring your warp and setting up your loom. Creating this cross keeps your individual warps separated and avoids tangled yarn and messy situations. While losing your x is not the end of the world, it is definitely still something you want to avoid if you can help it. 300 tangled warp ends aren’t anyone’s friend.
Trust me.
Using your warping board

Attach your yarn straight from the cone/ tube/ or skein by tying it to your first peg.
Follow your lead yarn so that it goes over peg 2 and under peg 3.
Continue over the rest of your pegs and wrap around the last peg at the end of your leader yarn.
Follow the lead yarn back to the beginning but this time you will do the opposite of what you did originally.
Go over peg 3 and under peg 2.
Continue by going around peg 1 and starting over.
Do this as many times as you have warp ends!
You can count your warp as you go or just count every so often – it’s up to you. I do recommend stopping every once in a while to count out your warp ends and bundle them every 25-50 warps with a looped piece of yarn and an overhand knot. I always count more than once, just in case. This will make it so at the end you don’t have to count and recount hundreds of warp ends. (shown in first image under warp ties below- top row)

Once you are finished – cut your warp yarn with some to spare and use that end to tie your warp bundle together at the last peg. To do this you will loop your cut end around the top bundle and then bring it back through the loop you created. (shown above)
Do this twice.

Warp ties

You can use any yarn that you have that is a different color from your warp (I talk about using recycled yarn for this exact reason in THIS post!) I like to call warp ties “security blankets” or “safety nets” because they help to make sure all your hard work counting out and creating your warp bundle doesn’t end up in a big pile of knots! The warp ties in the images above are made with bright blue yarn.
The most important space for your warp ties is around your x. You will essentially be wrapping your security blanket yarn around this cross twice to make it really secure. Then a simple overhand knot will keep it in place. (see the third picture above top row)
You will also want warp ties:
- On each side of your x. Make a loop around the bundle and use an overhand knot. This will help you out if you accidentally lose your x later on.
- Around every foot or so of warp. I usually do this on all of the “flat” areas. Instead of a simple loop, I secure these sections with twining.
Once you are done with all your warp ties you can carefully pull your warp off your board and transfer it to your loom! If you are planning to warp your loom right away then you can move it straight over. If you are planning to warp your loom later or you need to transfer it then I recommend chaining it to move it easier.

How to chain your warp bundle

If you crochet then think of this the same way you start a project, but with your arm instead of a hook. Stick your arm through your x loop and reach down to your bundle.
Pull up some of the bundle through your loop creating another loop.
Continue until the end.
This will create a shorter bundle that is easier to transfer and less likely to get tangled.
Things to keep in mind
If you have a lot of warp ends then I recommend measuring out your warp bundle in stages. Once you are setting up your loom you can’t stop mid-sleighing of your reed for each bundle (when warping front to back.) When you break up your warp into multiple bundles it allows you to take a break if you need to. Get up and stretch or grab a sip or water.
I recommend this once your warp ends get to be over 200. Then just break it up into bundles of 100 or whatever amount seems manageable for you.

If you come across any knots in your warp yarn while using your warping board then you will want to keep those out of your finished weaving. Cut your warp yarn at the knot and go back to either your 1st or last peg (whichever is closer) and tie the warp to the peg just like when you first started (see above.) Start again from this same peg and keep going. You may lose a little bit of yarn this way depending on where your knot was, but it’s better than having a knot in your weaving!
This is also how you would keep going if you finish up a cone of yarn and need to start another. Knots at the end of your bundles around your pegs will not affect your weaving at all because they are a part of your loom waste. Knots in the middle of your warp will be visible in your finished weaving.
You can avoid them.
Stabilizing your warp cone or tube while measuring your warp will help you have a more fluid motion with your board. It will also keep your yarn cleaner since it’s not rolling all around your floor. You can use a cone holder like this one that will rotate and keep it coming off the cone smoother. Or this stationary one that holds up to 4 cones at a time.
Or you can just put your warp yarn in a box on the floor and let it roll around in there. Not quite as elegant and a little finicky, but it works!
Warp a little faster

Using two hands while you are warping can actually make it go faster. Follow your leading hand with your other hand in order to help you smoothly get around your pegs. The more you use your warping board the faster you will get and the easier it will be to get in the flow.
Put on some music and enjoy the movement of the warp across the board. It can be almost as meditative as the weaving itself.


Please tell me where to get the brackets that hold the warping board in the photos.
The brackets I am using can be found on Amazon HERE (
Thank you!!!
Thank you for this very informative post. I’m thinking of moving up to a table loom from my rigid heddle loom but was feeling intimidated by a warping board. Now that I have a better understanding of it, I feel more confident!
That’s great to hear! I totally get it so I’m glad to hear this post made you feel more comfortable to try it out. Good luck with your weaving!