Weaving Rules Are Meant To Be Broken
Have you ever heard the statement that you need to learn the rules before you can break them?
For the record, that is a statement that I definitely agree with! I even have it on the Warped Fibers classes page when I’m talking about my weaving philosophy.
Weaving and art in general is meant to be explored and expressed in any way that you see fit. Knowing the rules first, though, means that you will be better at controlling your experimental techniques.
So if you understand the weaving rules, then read on. If you’re brand new, then read on! You can see what you have to look forward to.
Your Weaving Has To Be Straight

Most of the time you probably want straight selvedges on your weaving. If you do, then you should check out my post with tips for getting straighter sides to your weaving. Neat edges on your weaving generally create a clean and classic look. If you want something else…
Have you ever thought about not having straight selvedges on purpose? There are quite a few different ways that you can purposefully manipulate your selvedges to weave up wavy or uneven sides. One of the ways that you can do this is by using a technique called Navajo Wedge Weave. Essentially, you’re weaving eccentrically the whole time and therefore adding extra weft. This is what creates their signature selvedge design. If you’re interested in that technique than I recommend checking out THIS link.
These wavy selvedges aren’t exclusive to Navajo Wedge Weave, and in fact can be seen whenever you add a lot of eccentric weft to your tapestry. It just may not be as precise.
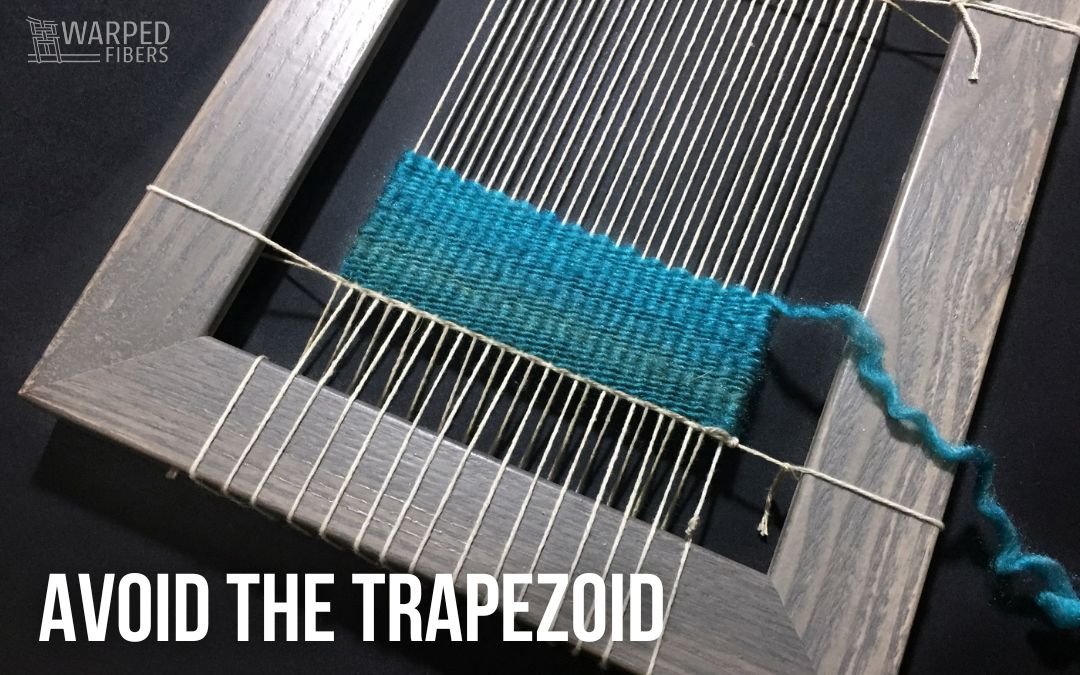
Another option? Look at the image above! In this case, I am manipulating the bottom selvedge and making sure it weaves up as a wavy uneven shape. All you have to do for this is to cut the shape you want out of a firm paper, card stock, or cardboard and place it in your warp. Then you can weave around it!
Here’s a rule you don’t want to break: Always weave from selvedge to selvedge at the top and bottom of your weaving if you can! This will make finishing your weaving much easier if you don’t have to worry about multiple tails or splits in your weaving.
Some other options for you are to manipulate the selvedges manually. Simply pull in your selvedges on purpose! Be careful because when you do this it will be hard to bring them back out if you want to.
Your EPI is going to change when you do this, so be prepared that your tapestry may turn into more of a balanced weave. If that happens then you will want to think more about your warp choice because it may become visible within your weaving! The color of your warp becomes very important when you are weaving a balanced weave!
Your Split Tapestry Has To Touch

Split tapestry is a technique that creates a slit in your weaving and allows you to weave clean vertical lines between two shapes. Most of the time you want to treat this split as though you have a selvedge in the middle of your weaving. A.K.A. Don’t pull too tight so that each side of the split touches so that you can sew it up later. Then pretend it was never there!
What if you want to create a hole?
There are a few ways to do this, but one way is to play around with this idea: pull your split tapestry on purpose!
Keep in mind that if you do this you will have to deal with the consequences when it comes to the rest of your weaving. Just like pulling in your warps in the previous section, when you pull your warps in this way it will change your EPI at that part of your weaving. You will have to work to put it back – if that’s what you want. Or just embrace it and make it works with the rest of your weaving.

You Can’t Combine Weaving Types
Just because you set up your loom for one type of weaving doesn’t mean that you can’t add in some others! If you think you will want to have multiple types of weaving in the same piece then you can set it up for the highest EPI you will need. Then you can just float over the warps you don’t need later on in the weaving when you want to change your weaving type.
This is an idea that is similar doubling your tapestry warp! When you double your tapestry warp you have to ability to add in balanced weave in addition to your tapestry. You could also weave up twill or other patterns by just playing around with your weft floats.
For example, if you want to weave both balanced weave and tapestry on the same piece then you could set your loom up for 12 EPI and then when you are ready to weave tapestry – weave over 2 and under 2 in order to recreate a 6 EPI warp sett.
If you’re worried that the two patterns or weaving types aren’t going to work together or weave up easily then make a sample! Samples can save you a lot of time and heartache.
Your Weaving Has To Be Flat

Just because you probably wove your weaving flat, doesn’t mean it has to stay that way! There are a lot of different things that you can do to or with your weaving to take it to the next dimension.
Some examples:
Gather it!
Once your weaving is off your loom, you can choose how you want to display it. You can check out THIS post for some general display options.
You can manually gather your weaving and tack it down to a canvas – just like I did in the image above. If the three dimensional areas are large then you might want to consider adding a little bit of wire to create an armature. Otherwise, eventually gravity will start to pull it down and won’t be quite so… perky.
Sew your weaving in the round!
One of the great things about weavings is that they’re fabric and fabric is flexible! You can sew your top and bottom selvedges together to create a continuous strip or twist it to create a mobius strip.
Pulled warp!
A technique where you leave negative spaces in your weaving to pull and gather later. This is a more controlled way to create a three dimensional weaving. It also allows for gathering without the need for something to tack the weaving down to.
You can also add texture, objects, and embellishments!
Any of these things will add more dimension to your weaving without actually changing the weaving. You can either embed them into the weaving or use embroidery to attach them to the surface.
Think about the things that you know you’re not supposed to do when you’re weaving and see if you can make them work for you! There are some rules that need to be followed if you want your weaving to turn out a certain way, but breaking weaving rules just might get you something better.

⇣ Love It? Share It! ⇣

You May Also Like