

There are certain things when it comes to weaving that are paramount to understanding how your weaving works, how to plan it, and how to make it do what you want it to do! One of the most important things to understand? EPI.
EPI stands for Ends Per Inch and refers to how many individual warps you need for every inch of your weaving to achieve the desired type of weaving you want. It can also be called your warp sett or your warp spacing. I will be using EPI and warp sett interchangeably throughout the post.
Interested in weaving initialisms? Don’t forget to check out the PPI post HERE!
So how can this aspect of weaving have such a large impact on your weaving and how do you figure out what EPI to use?
Read on….
This page may contain affiliate links. If you purchase something through these links then I will receive a small commission – at no extra cost to you! Please read our DISCLAIMER for more info. Thanks for the support!
Jump To:
- Why are EPI and warp sett important?
- Weaving imagery? Think of your weaving in pixels
- How do you figure out your weaving EPI?
- Make an EPI sample loom – small but mighty
- Warping your EPI Loom
Why are EPI and warp sett important?
EPI a.k.a. warp sett is arguably one of the most important things you need to figure out before starting a weaving.
The wrong warp sett will set you up for the wrong kind of weaving.
Let’s talk about this in a general sense first.
When you are planning a weaving you are planning for a specific type of weaving. Whether that is tapestry (weft-faced), pattern weaving, or warp-faced weavings you will need to correctly warp your loom with the right amount of warps at the right distance apart.
This is because your EPI will determine how your warp and your weft interact with each other.
You do not want to warp an entire loom expecting it to become a tapestry only to find out that your warp sett was too tight!
When you set up your weaving with a smaller EPI that usually means there will be more space between each warp. This usually means that the warp and weft will interact less. The less they interact, the more the warp can compress – creating a weft-faced weaving.
A larger EPI usually means there is less space between each warp. This creates a tighter weave that does not allow the weft to completely compress. As a result, you will see both warp and weft, creating a balanced weaving.
It is important to point out that this all can change depending on the size of both your warp and weft. Remember that we are concerned about the space between the warps. If you have a smaller EPI but a thicker warp there will be less space between the warps than if that warp were thinner.
Another example is that to weave a thicker weft into a weft-faced weaving you will need a smaller EPI than you would need if you wanted to do the same weaving with a thinner weft because you need more space!
So yeah, your warp density really matters.
Weaving imagery? Think of your weaving in pixels

When you are planning an image-based weaving it is important to remember that your weaving image will need to be “converted” into pixel-like shapes. That is because you are essentially weaving on a grid.
Think of it as making an image in any paint program on your computer or zooming into a photograph until the edges of objects are jagged.
Your EPI affects just how many pixels you have to work with. A larger EPI with small weft yarns will allow for a more detailed and less pixelated image.
If you want to learn more about weaving tapestry and/or image based weavings then I have 2 options for you! You can check out my e-book Weaving Shapes or my online tapestry course Weft-Faced: Tapestry Techniques & Beyond.
Both of these options will help you to break your weaving up into parts to help you easily understand what is possible and how to do what you want to do!
There are now 2 ways to take it – either purchase the whole course at once for a discount or “create your own” course by purchasing just the parts you want! Either way, get 10% off for being a member of the Warped Community!

How do you figure out your weaving EPI?
So where does all that information leave you?
Obviously, you should just know the exact warp sett, right?
Don’t worry, no one expects you to.
Most of the time when you buy yarn (especially weaving yarn over knitting/crochet yarn) there will be a recommended EPI for the yarn you are buying!
Learn about the differences between weaving and knitting/crochet yarn here.
The important thing to know about this number, though, is that it only applies to a balanced, plain woven fabric. Also, sometimes it has a range (for example 8 – 10 EPI).
Let’s tackle the balanced weave “issue” first.
If you are not weaving a balanced weaving, but instead weaving up a weft-faced weaving or tapestry then there is a really simple solution. All you have to do is divide it by 2!
So if a yarn has a recommended warp sett of 12 then it should work well for weft-faced weaving at 6 EPI. (This happens to be my go to EPI for my most used warp yarn 8/4 cotton rug warp).
Weaving up a pattern does complicate things a bit, but not much. Really it just gives you a little bit of wiggle room. Since patterns will have purposeful floats, the weft is not interacting with the warp as much as a balanced weaving. This means you can potentially use the recommended EPI or maybe a slightly smaller EPI. To confirm this, though, you should always sample. Don’t worry I am about to show you an easy way to sample your EPI!
If a recommended EPI is actually a range, that means you should be fine using any warp sett listed and it will depend on just how tight or lose you want your finished weaving to be – but you should sample it…
So that still leaves us with some questions.
What if we want to know for sure how well the pattern will weave up at the recommended EPI?
Which warp sett will we like best from the range?
Enter the EPI mini-loom.

Make an EPI sample loom – small but mighty
Making a mini loom to try out your EPI is a quick way to figure out what sett you like best without wasting time or materials.
Materials Needed:
Mat board, cardboard, chip board, or foam core
Pen or pencil
Yarn
Ruler (preferable cork-backed so it is more stable)
Tapestry needle
How to make your EPI loom
First, cut your board into a 4-inch square.
This will give you 2 inches of weaving space to sample your EPI. In my example below, I have used mat board. Since mat board is solid and not corrugated it is a bit firmer and therefore nicer to work with. This will also make sure it lasts longer and is better to weave on, but the other options listed above will also work.
Tip: When cutting through a thick material like mat board – make a lot of long shallow cuts instead of trying to cut through all at once. You will save your wrist and create a cleaner line.
On the top and bottom of the square mark each inch with a pen or pencil and cut a notch at the first mark on the top and the last on the bottom (see arrows).

Warping your EPI Loom
Start warping your loom at the top notch. Your yarn should fit snuggly in the notch and you shouldn’t need any tape.
Next, wrap your prospective warp around the loom so that it corresponds to the EPI you want to try out.
Nothing fancy here! Just wrap around the loom in a big circle so that it looks the same on the front and the back.
Make sure to count your warps and that they correspond with the EPI you are trying out. For example, if you are sampling a warp yarn for 6 EPI then you would make sure there are 6 warp ends in each 1-inch area.
Do this for at least 2 full inches so you get an accurate sample. Doing smaller than 2 inches could skew your results if you have uneven weaving along your selvedges. Also, it is important to make sure the warps are evenly spaced, otherwise, your EPI will be incorrect! Do this to the best of your ability. It does not have to be perfect – but it should be close.
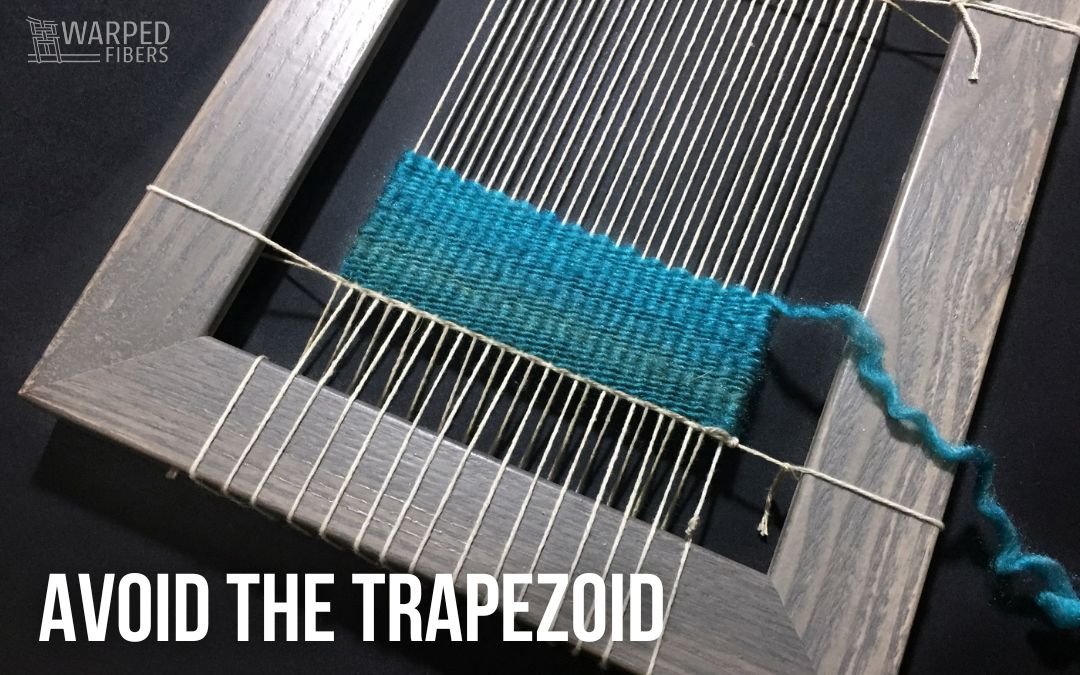
In this example, I have spaced the warp out to 6 EPI which means that I have 12 total warp ends (6 ends per inch x 2 inches.)
Your last warp will end at the bottom notch. You can cut it off at the back at about an inch as shown.


Now you can weave with your prospective weft! Using a tapestry needle, manually weave at least an inch of weft.
Is it working the way you want?
Awesome! Move onto the actual weaving!
If not, either try a different weft yarn or re-warp with a new sett and try again.
Keep in mind you shouldn’t force the weft yarn to do what you want. Most of the time when you are weaving you should be placing the weft and not forcing it. I know it is called “beating” your weft, but that is really only reserved for rug weaving or anything you want to have a very dense fabric.
Learn more about how to correct place your weft here.
Repeat sampling as necessary. Don’t get discouraged if you have to try out more than one sample. It is better than warping an entire loom wrong!

Above is a comparison of 6 EPI and 12 EPI. The warp yarn is the same, but the weave structure is different. In this case, 6 EPI creates a weft-faced weaving and 12 EPI creates a balanced weaving.
Now that your loom is warped you can try out different wefts on the same sample. Turn it upside down and try a different sized yarn or turn it over and try a different yarn on the back.
What happens if you use a thicker weft? Or a weft with a lot of texture? You won’t know unless you try it!
Work smarter and not harder by warping once for multiple samples!

To take your sample off the loom all you have to do is cut the warps on the back or across the top. You can finish them off by tying simple knots or any other finishing techniques you want. Hold onto your samples to look back on the next time you want to use that yarn and EPI or recycle your yarn for something else and just take some notes!
This mini-loom is great because you can keep it in a binder, bag, sketchbook, or pretty much anywhere and it will not take up any room. Hang onto this and use it whenever you are trying out some new yarn or a new project!
Or you could guess what EPI you should use.
You know, if you like to live dangerously.
What is your favorite way to figure out your EPI? Have you tried out your mini-loom yet?

⇣ Love It? Share It! ⇣

You May Also Like


Total newbie here 🙂 l loved your ‘Learn How To Make An EPI Mini-Loom’ – thank you. Is your Self Healing Cutting Mat transparent? lt looks a bit like it *is* – could you tell me where your one is from please? 🫒
It isn’t transparent. Just a fun blue color. I got that one a long time ago probably at the book store at the school I was at at the time. Sorry!
Would like to know about classez and guilds in long beach, south bay or orange county. I live in.long beach, california
The best thing to do if you are looking for something local is to either ask around with other local weavers or to google it. Good luck!