

A simple frame loom is a FANTASTIC piece of equipment to have in your studio. They are versatile, portable, and easy to store.
They happen to also be a great way to learn how to weave.
In fact, a simple frame loom was the very first loom I ever used. When I was learning how to weave we used a loom made from 18”x 24” canvas stretcher bars. No lie, I still use this exact same frame all the time in my studio (and I have a few more now too.) This is also my preferred loom I use to teach my tapestry class and workshops because it i great for beginners, but has enough potential to still be perfect for professionals.
You might say I am a fan.
Jump To:
- What is a simple frame loom?
- Pros of a Simple Loom
- Cons of a simple loom
- The best weaving loom for beginners?
- Watch the video
What is a simple frame loom?
A simple frame loom is any loom made from a frame that does not use notches, nails, or any other method to hold and space your warp.
Simple.

What are the other loom options and are they actually different?
When it comes to looms, there are so many out there that are great for different types of weavings, different types of weavers, and different types of studios. For the sake of staying in a singular and similar category to our simple frame loom we are going to focus on smaller more portable looms that are often used for tapestry.
Different companies or people may call these types of looms by different names.
None of them are wrong.
Tapestry looms, frame looms, or lap looms are some of the most common names you might come across when researching and searching for your perfect weaving equipment. I usually stick with “frame loom” as it feels the most broad to me and therefore can cover most everything in this category. Just keep in mind what one weaver calls a tapestry loom – another may call it a frame loom.
One of the best ways to think about these different looms is in degrees of complexity – hence the simple frame loom. As I state above, these simple looms are very much just a frame with nothing else. No bells, whistles, or notches to be found. Other, more complex, frame looms may have dedicated notches for the warp, a device to make weaving simpler (more on that below), and even an advancing warp mechanic. The looms vary widely in their price, size, and extra options.
So why would you choose one over the other? Let’s take a look.

Pros of a Simple Loom

Simple frame looms are cheap, easy to find, and portable
You can use any frame you already have to weave on and you do not need to do anything special to do it. Head down to a thrift store or the clearance section of your local craft store and buy some picture frames. Take the glass out and voila! Frame loom!
Tip: When looking for a picture frame to use as a loom, opt for one with straight sides. While the fancy wavy ones seem tempting, they will make warping harder. Don’t worry, there are a lot of beautiful frames with straight sides. Does it matter how the frame looks? Maybe…. (we’ll get to this)

Using picture frames as your loom can be an super portable option when they are small and lightweight. They can easily fit in your bag to take with you on vacation, on the train, or just to your backyard.
If you are looking for something of a more specific size, you can not go wrong with taking canvas stretcher bars and creating your frame from them. (THESE are the ones I use)
The stretcher bars are bought piece by piece which can allow for more unique sizes. For example – try making a 6” x24” frame if you want a loom that is long and skinny. It could be hard to find a pre-made frame that size.
Stretcher bars are generally really inexpensive because they are not meant to be pretty since they are usually covered up by canvas for painting. If you like this option but want something more attractive you can always decorate your simple frame loom to your liking later on.

These weaving looms give you a lot of options
Simple looms are incredibly versatile since you are not confined to any specific warp sett.
Recap: the nature of the simple frame is that it doesn’t have any notches or pins to set your warp. The same frame can be used for a 5 EPI, 8 EPI, 14 EPI, etc. weaving! Having options means you can not only change everything up between weavings, but also within the same weaving! (Learn about EPI HERE) I personally think this is one of the best things about a simple frame loom. It can do pretty much anything I want it to.
Due to the versatility of the simple frame loom you can play with your EPI’s with no extra effort.
For example, there is a weaving technique called crammed and spaced where you purposefully have more than one EPI within the same weaving. Using a simple loom helps give you the flexibility to experiment with techniques like this without needing extra equipment like special reeds or rigid heddles.
If you do not want to be stuck using the same warp sett for all of your weavings this can be a better option than owning multiple frame looms.
Not that that is a bad option. It depends on how much room you have in your studio.
Simple frame looms can have a built in display system
Choosing to use a plain frame (or a decorative one!) gives you the option to not only use the frame as a tool, but also as a way to display the weaving. This isn’t something that I do all the time – but admittedly it is really great option to have.
I have a stockpile of frames that I use for this reason…
Or maybe I just like buying picture frames.
I am always picking them up from clearance sections and while on sale. One thing to keep in mind when you use picture frames – you will have an excess of glass to deal with. I usually collect all my leftover glass pieces and then post them for free on Facebook marketplace for other people to create with!
There are a few ways to set up a weaving so that it can stay on the frame (2 selvedge warping is a good one!) If you do not like one option for warping your frame – then just try another! I have a 2 selvedge warping course that should be published before the end of 2025!)
Here is a pro within a pro: if you use your frame as the display method, when you are finished weaving – it is pretty much done! You do not have to do anything to the warp to finish it up and since it will stay under tension forever- you have to do very little (if anything) to the weft tails.

You will have less loom waste
Loom waste is the warp that will never get woven on your loom. The loom type you are using will usually determine the amount of loom waste you need to account for when planning and warping your loom. This is a necessary extra amount of yarn that you will need to attach the warp to your loom and allow it to work.
In looms that have advancing warps, a lot of shafts/ harnesses, or even just a shed system, you are more likely to use up more loom waste. This is because there will always be warp that you cannot access from the weaving area of your loom.
A simple frame loom, on the other hand, has probably one of the highest percentages of weaving space out of any loom. This is because there is nothing stopping you and creating a barrier on your weaving surface.

Having less loom waste is a really big plus and will save you money. While it is possible to use your loom waste for other things, ultimately, you will be using yarn you would not need to in other circumstances. Using less will save you money and allow you to use more of your good yarn for your weavings and not other weaving or non-weaving tasks.
Using the 2 selvedge warping method is a great way to have very little waste, but if you want to use even less warp waste, then you can try a 4 selvedge warping technique which has only a negligible amount of waste (if any!)

Cons of a simple loom
Well… nothing is perfect.
They require some math
Anytime you are setting up a weaving you will probably have to do a little bit of math. This goes for simple looms, commercial looms, floor looms, and basically any loom you can imagine. You can not escape the math completely.
Sorry.
The amount of math you have to do, though, depends on a few things.
If you are ordering a specific yarn for your warp then you may have to figure out exactly how much to purchase regardless of the type of loom you use. This goes for general convenience and integrity of the color. It is very annoying to be halfway through setting up your loom when you run out of yarn. Then you have to order it and wait for it to ship. All the while – you could have been weaving.
If your yarn is dyed than it is important to try to buy all of your yarn at one time to avoid any differences in dye lots. I have made this mistake before. I bought the exact same color – but when it came in it was a little bit lighter.
You live, you learn.
A simple frame loom requires figuring out your total warp ends. (Click on that link for how to plan your weaving!) This is a simple equation, but an equation none-the-less. It is determined by the EPI that you choose, the size of the weaving, and your warping method.
A commercial loom, on the other hand, will have a specific EPI that it is set for. In that case, you would only need to know the width of the weaving you want to create.
Don’t worry – it’s not like this ↓

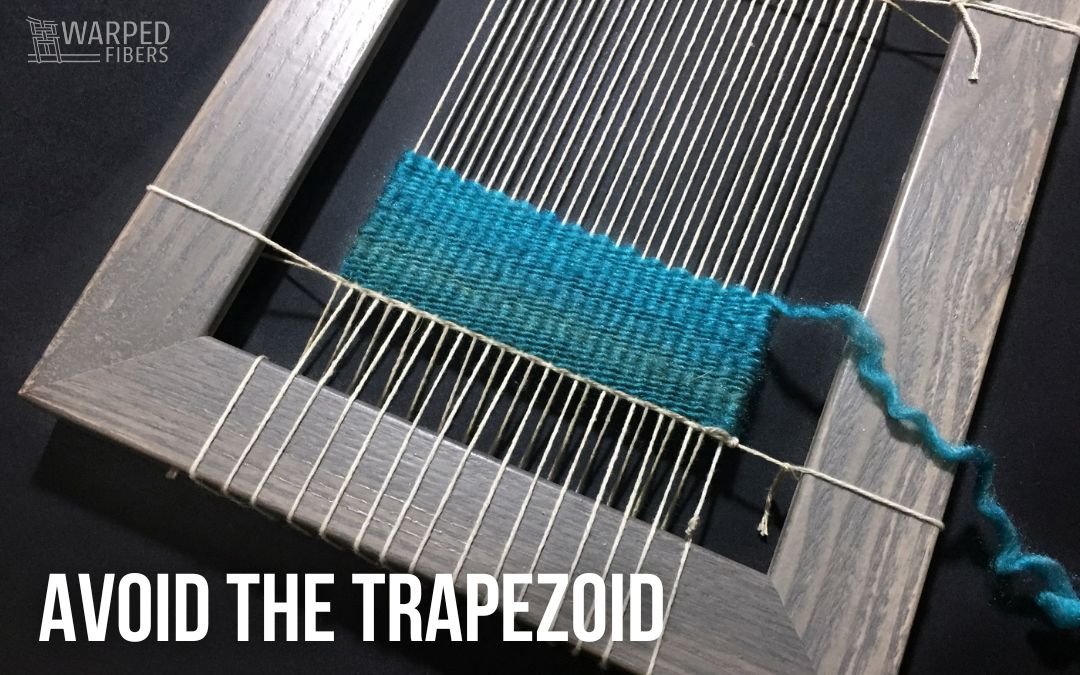
Spacing can be inconsistent or move around
Due to the fact that there are no nails or notches in your frame, you are the one responsible for creating the correct spacing and maintaining it. Without anything to anchor the warp in place it is a lot more likely to move around. Anytime your warp moves, there is a chance that you could alter your EPI. Suddenly you may have 5 EPI on one side of your weaving and 7 EPI on the other. That can be a problem as it may alter the type of weaving you are creating or just make your weaving look inconsistent.
While we do want consistency, if your spacing is not 100 percent perfect then you can probably still be ok! Just make sure that it is not too far off. Weaving is a lot more about consistency than perfection.
Admittedly, if you struggle when things aren’t totally perfect, then this may not be the best option for you. Or maybe it will help you to go with the flow? Perfectionists may want to try this at your own “risk”!
Luckily, during the first inch or so of weaving, you can still fix your warp spacing. After that? It is mostly set. Using a simple frame loom requires a bit more patience to create and maintain even spacing – but it is totally doable! If you do not want to deal with that though, then a commercial loom can be less finicky.
There are some tricks to help maintain even spacing on your simple loom that I cover HERE!
These looms have no heddle bar or shed system

Heddle bar?
Shed system?
A heddle bar is a tool that you can use to create an opening (shed) in your weaving. The way you create your shed is considered a shed system.
For example, in plain weave, the heddle bar would raise every other warp so that you can eliminate the need to do the “over, under” motion. You would then rotate the bar to do the opposite: “under, over”. This allows for faster and simpler weaving.
The creation of the shed also allows you to use a shuttle, butterfly, or a bobbin instead of just a long piece of yarn.
This is a big advantage in the commercial loom column if you do not like weaving your tails back in. With the ability to use one of these tools you won’t have to change out your yarn as much. Every time you change your yarn you create a new tail you will have to deal with when you are done. This advantage is most notable if you are using a lot of one color. If you are weaving imagery and using a lot of different colors anyway, it might not be as big a deal.
While it is possible to make a heddle bar if you really want one for your simple frame loom, that takes extra time and effort. Most commercial frame looms have a heddle bar already included.
Some other shed systems would be creating string heddles and heddle rods or using a shed stick. You can experiment with any and all of these to see if they fit into your weaving style and flow.
The best weaving loom for beginners?

Beginner weavers usually benefit from something that is simple, inexpensive, and versatile.
You do not want to spend a ton of money if you do not know that weaving is right for you – and I would not want you to!
So finding a weaving loom that helps you to get weaving sooner and explore weaving in many of its forms is essential for new weavers! If you are a more advanced weaver and you are looking for something to add to your studio, then there really is no reason not to get a simple frame loom as well. Seriously, what are you waiting for?
This is the loom everyone should have in their studio!
Looking to add more looms and not sure how to find ones that work together? Read this!
Watch the video
With all of that there is no reason you can not have more than one kind of loom.
More looms = more fun!
So why do I stick with a simple frame loom? The pros just outweigh the cons to me. The biggest one that I do no want to give up?
The ability to improvise.
When it comes down to it. I am not a planner.
Do you have a favorite kind of frame loom? Let me know!

⇣ Love It? Share it! ⇣

You May Also Like


Hi Nicole, thanks for this post. I have a basic beginner flat loom that is 3 ends per inch. I am counting each loop around the notch as an end. I am now trying to warp a picture frame with E ends per inch. If I consider each loop around the bar at the bottom the same as a notch- I would need 36 ends for a 12 inch wide weaving. . However when I do that- the warp is much more dense than the warp on my notched loom. Do you count the ends differently when warping a frame? Should I have 18 total wraps on the bottom and 18 on the top to get the same effect as my notched loom?
It’s hard for me to tell for sure without a picture of exactly what you’re doing, but when I warp my simple frame loom I do only count the wraps. It sounds like you are doubling all your warps. Try decreasing them by half and see how it goes!
I know this is an old post, so I’m not sure you will see this comment, but if you know an oil painter, they might like the glass panels you have. They make wonderful paint palettes.
Thanks, this is a great tip! I actually did this with one of the glass panels, but there are so many!
excess glass?: paint it using faux stained glass style. you can buy the liquid lead or sticky strips for the outline and transparent paint that dries looking like stained glass somewhat.
Great! Thanks for the tips!
If you are making simple looms with picture frames one great idea for the glass is creating art with them using palette knife and putty (putty you would use to fix drywall or holes in walls ) I purchased it in a small pale. Palet paint the putty right on the glass. You can even add acrylic paint color to the mix. Or paint after putty is dry
Thanks Cheryl! That’s a great idea!
I have a loom that has the notches on the ends and a heddle bar but was wondering if it is possible to weave something that is longer the loom. The loom I have is 150cm by 40 cm and I was hoping to weave a tea towel.
I believe there is a way that you can turn your loom into one with an advancing warp – it isn’t anything that I have done before. You always have the option of weaving panels and attaching them together ( I have a post on this coming up!)
Thanks for this. I just set up a stretcher bar frame loom and warped it. It really was a relief to be able to warp for the weft I intend to use. I don’t know the exact size of my warp thread but I set it up with twelve ends per inch and am using number three perle cottons as weft. It is working beautifully.
I would like to see a lot more blog posts about working with the simple frame loom: fringeless weaving, advancing warps, basic techniques, small projects, etc.
Awesome! That’s why they are so good 🙂 I have a new post on maintaining your spacing on a simple frame loom you should check out. Thanks for the input too, I always want to hear what the community wants to read. Don’t worry, it is noted!